# Vagrant

# Introduction

![image-1557376718546.png](https://bookstack.chesterwhitwell.co.nz/uploads/images/gallery/2019-05/scaled-840-/image-1557376718546.png)

### What is Vagrant?

Vagrant is an open-source software product for building and maintaining portable virtual software development environments.

![image-1557376805473.png](https://bookstack.chesterwhitwell.co.nz/uploads/images/gallery/2019-05/scaled-840-/image-1557376805473.png)

### What is Virtual Box?

Virtual Box is a programme which will allow you to make virtual servers on your current computer.

### Prerequisites

Before continuing. You must have both vagrant and virtual box installed on your computers

<div id="bkmrk-vagrant-virtual-box"><div><div>- [Vagrant](https://www.vagrantup.com/)
- [Virtual Box](https://www.virtualbox.org/)

</div></div></div>It is also good to have some basic knowledge of command line tools like Terminal, gitbash, command prompt, etc

# Setting up a development environment

### Getting started

When using computers, sometimes we aren't the admins and cannot 100% control what we can do. Sometimes non admins can't even add files or folders to specific parts of the computer. This is the case at Yoobee.

> Using Vagrant and Virtual Box, we will be able to make a virtual environment on our computers which we will have complete control of.

#### Common <span class="program">terminal</span> commands we'll use

**On a Mac (linux on PC)**

- `<kbd class="ls">ls</kbd>` To list file in the current directory, use.
- `<kbd class="cd">cd</kbd>` To navigate to a directory, followed by the name or path of the directory.
- `<kbd class="mkdir">mkdir</kbd>` To make a new directory, followed by the name or path of the directory you want to make.

**On a PC (windows)**

- `dir` To list file in the current directory, use.
- `<kbd class="cd">cd</kbd>` To navigate to a directory, followed by the name or path of the directory. (you can use `cd ..` to go back one directory)
- `<kbd class="mkdir">mkdir</kbd>` To make a new directory, followed by the name or path of the directory you want to make.

#### Using the pre-built Yoobee box

Yoobee has created a vagrant box that you can use. It contains al of the technologies you will need to host most websites for local development.

> It's a LAMP server (linux, Apache, MySQL and PHP) it also contains Node version manager (nvm), composer and phpMyAdmin and has build to enable you to install and run WordPress and will work with a number of other CMSs.

<span style="color:#222222;font-size:2.333em;font-weight:400;">Setting up your server</span>

#### Adding the box file to vagrant

<p class="callout info">This step only need to be followed once. If you have already done these steps on your current computer you can then skip to **Creating a new server**. once a box is added it can be used multiple times. (if you forget this step, it will still work. The box will be downloaded and add during `vagrant up`.  
[https://app.vagrantup.com/yoobeecolleges/boxes/newLAMP](https://app.vagrantup.com/yoobeecolleges/boxes/newLAMP)</p>

The easiest way to add the box to your computer is to use the command below:

`vagrant box add yoobeecolleges/newLAMP`

#### Creating a new server

We need to create a place on your computer where you will hold all of your virtual servers.   
You can create as many as you want but it is recommended that you keep them all together.

Create a new folder in your home directory called **vagrantProjects.**

`<strong>mkdir ~/vagrantProjects</strong>`

Create a new folder inside your **vagrantProjects** folder. This will be where or new server lives.

`mkdir ~/vagrantProjects/newServer`

Each folder created will represent a different server.

In the terminal navigated to the new servers folder.

`cd ~/vagrantProjects/newServer`

Once you are inside that folder we need to initialise the vagrant server.

`vagrant init yoobeecolleges/newLAMP`

This will create a file named **Vagrantfile** inside that folder. use `<span class="ls">ls</span>` to check that it exists. if does we can start the new server.

`vagrant up`

This will start the of the server. It might take a while the first time you do it. Just wait and it will eventually finish.  
It may says that it is trying to disconnect and reconnect, don't worry, it should eventually connect if you followed all the previous steps correctly.

Once finished your new server will be accessible in a browser using the URL [http://192.168.33.10/](http://192.168.33.10/).

you should see something like this:

![image-1557359568433.png](https://bookstack.chesterwhitwell.co.nz/uploads/images/gallery/2019-05/scaled-840-/image-1557359568433.png)

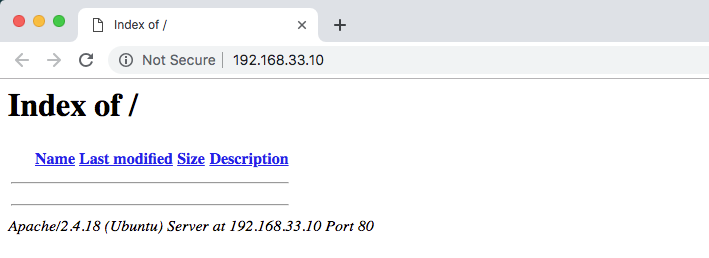
This means you have successfully create a vagrant server using the pre build **yoobeecolleges/newLAMP**.

#### vagrant commands

> Vagrant commands often relate to the folder you are currently in, in the terminal.

`vagrant up` Will start a server in the current folder if a **Vagrantfile** exists.

`vagrant halt` Will stop a server in the current folder.

`vagrant reload` Will restart a server in the current folder.

Make sure you **Halt** your server before you log out or restart your computer. **Reload** your server if it's not functioning as expected

#### Using the server

The first time we used `vagrant up` in out new server folder, a new folder named **www** was created. This folder is the web root directory for our server. Files placed in the folder will be displayed in the browser. In the root of this folder **index.html** will be displayed first.

Vagrant is a very powerful tool you can learn more by reading the documentation here [https://www.vagrantup.com/docs/](https://www.vagrantup.com/docs/)

# Wordpress