Introduction
Aplus+ and Take2
Enrolment
Each of the students in any of our programmes will have been through an enrolment process. They will have provided us with their personal information and which programme the wish to study.
The information is usually collected on an enrolment form and fed into our student database ‘Take2’ via CRM.
Take2
Take2 is where all records relating to a students completion or non-completion exist. It’s information from this database we provide to TEC to demonstrate our performance.
Take2 to Aplus+
The data in Take2 including the the qualification, intake and individual course each student is enrolled in, is synchronised with Aplus+. The synchronisation takes place overnight.
Tutors mark attendance and enter course completion data into Aplus+. Administrative staff return completion data to Take2 in order to print transcripts and Diplomas/Certificates.
If you discover that students information is incorrect or you have additional or missing students in your courses in Aplus+; it usually means the information is wrong or missing in Take2.
Accessing Aplus
We access Aplus+ using any web browser. the link is aplus-yoobee.myacg.org
You will presented with a login screen (use your 6 digit user code and password).
The home screen is divided in to 4 main areas:
- The tabbed drop down menu bar at the top
- A list of courses you have been added to in the middle
- Stats and other information on the right
The top right corner also displays the date range for courses that will be displayed, This should normally be set to the ‘current year, Whole Year’ clicking on it will allow you to change it to a different year of a specific date range.
Aplus+ for attendance
Attendance in APlus+ is entered for each course in a qualifications intake.
Courses
We can view the courses that are running for a given qualifications intake by first selecting Courses –> Course list from the main drop down menu. Then selecting an intake from the drop down within the grey field.
You will be presented with a table of all courses running under that intake on the campus selected, during the year or time period shown in the top right corner.
If you are unable to see a Qualification or intake, check that the correct Campus and Year is displayed in the top right corner.
Each course will indicate in its course code and which intake it's for. The first 4 digits are the year and month, the last character the A or B class.
Clicking on a course from title column will take you to a tabbed interface with information related directly to that course.
Overview
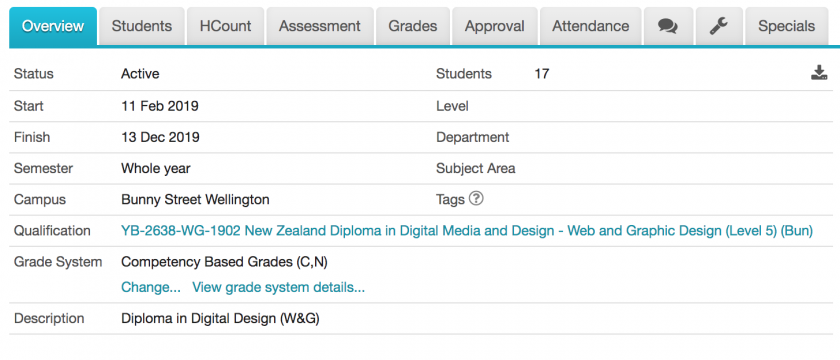
This is where you can see the start and end date for the intake (not the module).
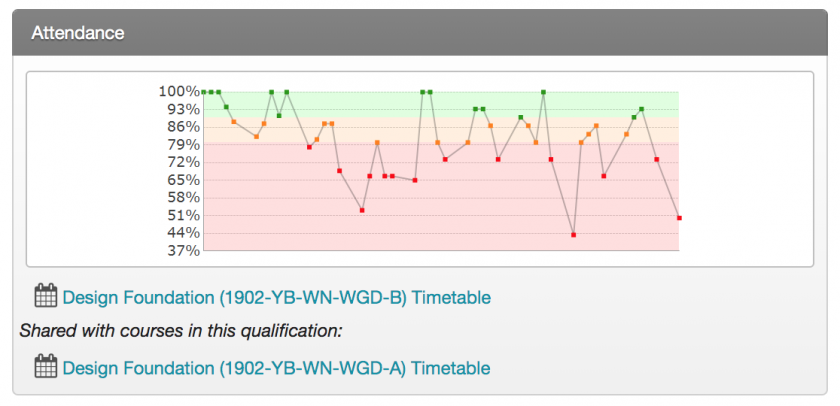
There is a graph of the attendance for the last 2 weeks on the right and some links to other course under this qualification.
The staff section lists all staff currently assign to the course. You need to add yourself in order to mark attendance or enter assessment grade/completion information. Click 'Add myself...'

Students
Here you can see a list of all students and their information that are enrolled in the selected course.
clicking a students id number will give you more details about that student including the ability to view and add special notes.
Attendance
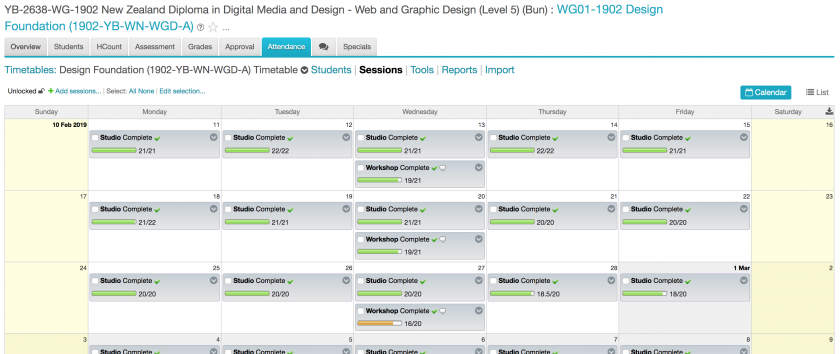
This where we can view and enter the attendance for the classes we teach.
The time table can be viewed by student or by session. In either view clicking the title or date of a session will allow you to enter attendance for that session.
Students can be marked as one of the following:
- Present – Attended the entire session
- Half session – May not have returned after the break, or wasn’t in attendance for the first half of the session. In either case you must explain in the comment box.
- Absent – Missing for the entire session, with no communication, or with an unsuitable justification
- Explained absence – Was not in attendance but has made contact and supplied a suitable justification. must be entered in the comment box
- Late – Wasn’t present at the beginning of the class but arrive within 15min of it starting. you enter the time in the comment box
Once the attendance is entered click Save near the top right corner.
For classes over 3 hours long you should update the attendance towards the end of the session or at the beginning of the second half.
Clicking the Report link under the attendance tab will Give you a quick overview of how how your classes attendee is tracking, You’ll be able to quickly identify students who’s attendance is putting them at risk.
C – Complete
N – Not yet complete (resubmission in process)
Aplus+ for assessment
Assessment data from Aplus syncs with take2 to enable our administrator to print transcripts. It Also enable HOFs to quickly see how a given student, course or qualification is tracking.Each course in a qualification will have one or more assessments linked to it. For competency based programmes all assessments will need to be completed in order to pass the course.
Assessments for each course have already been created. The grades are entered from Grades tab within a course. Clicking Summative Assessment under the Course assessments column in the table displayed will bring up a new table listing the students in the course and their grade for that assessment. The grade will be blank if no grades have been entered.Clicking the Edit Marks button next to the assessment title will allow you to enter the grade for each student.
Reports
The report section of Aplus+ allows us to create and view statistics generated from the attendance and assessment data. This section has three tabs:
- Overview – A large list of reports that can be generated
- Shared Reports – Reports that other staff, HOFs and administrators have created
Ask a HOF or campus manager before sharing a report. Because they are visible to all staff across all campuses it is best to only share report that are useful across faculty and/or campuses. Reports can be easily shared with a smaller group of staff by coping and pasting the report url into an email or slack post.
- My Reports – Reports that you have created and saved
Clicking Change criteria will allow you modify the report to accommodate different courses or qualification or date ranges.
Interface Tips
Star pins
from the course list view or from with in a course you can assign a range pins to a course to help identify it in your interface. Using the Star Yellow and Star Red pins will make the the course available in your home screen.
Changing what information is shown when viewing student lists
When viewing the list of student from within a course, you can change what information is displayed. Clicking the pencil icon in the top right of the table view will allow you to turn on and off different information. You may wish to display student phone number or not display their date of birth. you can customise the view to display only information that is useful to you.